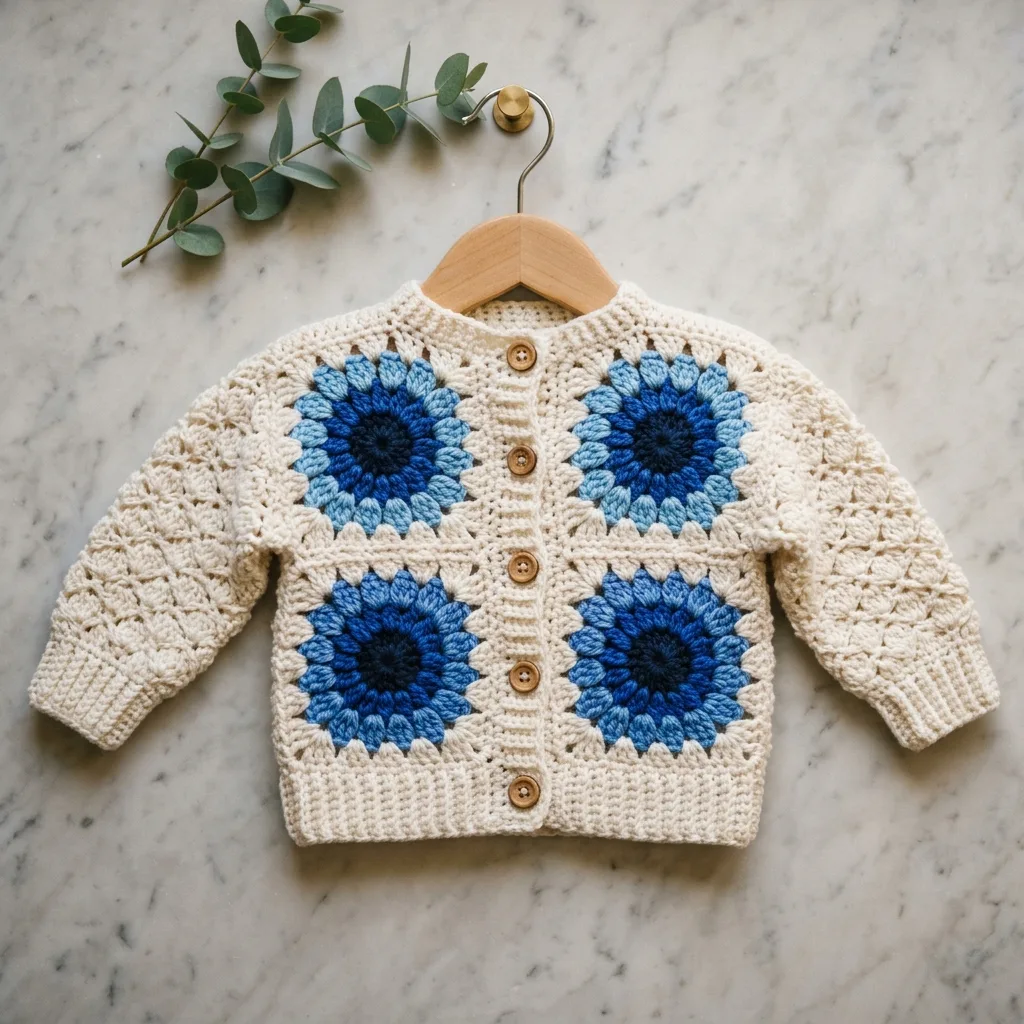
This cream and blue granny square baby cardigan combines classic technique with modern charm. Featuring four bold sunburst-style granny squares on the front, lacy shell-stitch sleeves, ribbed edging, and wooden buttons, this cardigan fits babies around 6 to 12 months. Here is the complete pattern.
Materials
- Worsted weight cotton or cotton blend yarn:
– Color A (cream): 150g
– Color B (navy): 25g
– Color C (medium blue): 25g
– Color D (light blue): 25g
- 5.0mm crochet hook
- 5 wooden buttons (15mm)
- Yarn needle
- Stitch markers
Gauge
One granny square = 4 inches x 4 inches after blocking.
Finished Measurements
- Chest: 20 inches
- Length: 10 inches
- Sleeve length: 7 inches
Abbreviations
- ch: chain
- sl st: slip stitch
- sc: single crochet
- dc: double crochet
- sk: skip
- sp: space
- rep: repeat
- RS: right side
Sunburst Granny Square (Make 4)
Round 1: With Color B, magic ring, ch 3 (counts as dc), 11 dc in ring, sl st to top of ch-3. (12 dc)
Round 2: Ch 3, dc in same st, 2 dc in each st around, sl st to top of ch-3. Fasten off. (24 dc)
Round 3: Join Color C in any st, ch 3, dc in same st, dc in next st, 2 dc in next st, dc in next st, rep around, sl st to join. Fasten off. (36 dc)
Round 4: Join Color D, ch 1, sc in same st, ch 2, sk 2 sts, sc in next st, ch 2, sk 2 sts, rep around, sl st to join. (12 ch-2 spaces)
Round 5: Sl st into ch-2 sp, ch 3, 2 dc in same sp, ch 1, 3 dc in next sp, ch 1, rep around, sl st to join. Fasten off. (12 clusters)
Round 6: Join Color A in any ch-1 sp, ch 3, 2 dc in same sp, dc in each of next 3 dc, 3 dc in ch-1 sp, dc in each of next 3 dc, rep twice more, then work corner: (3 dc, ch 2, 3 dc) in next ch-1 sp. Continue pattern around, placing corner clusters at every third ch-1 sp. Sl st to join.
Round 7: Ch 3, dc in each dc around, working (2 dc, ch 2, 2 dc) in each corner ch-2 sp. Sl st to join. Fasten off. Weave in ends.
Joining Squares for Front Panels
Using Color A, whip stitch two squares together vertically for each front panel. You will have two panels of two squares each.
Back Panel
Row 1: With Color A, ch 43. Dc in 4th ch from hook and each ch across. (40 dc)
Rows 2 to 22: Ch 3, turn, dc in each dc across.
Fasten off. Back measures approximately 8 inches wide by 8 inches tall.
Sleeves (Make 2)
Row 1: With Color A, ch 28. Sc in 2nd ch from hook, sk 2 ch, 5 dc in next ch (shell made), sk 2 ch, sc in next ch, rep across. (4 shells)
Rows 2 to 14: Ch 3, turn, 2 dc in first sc, sc in center dc of shell, 5 dc in next sc, sc in center dc of shell, rep across, ending with 3 dc in last sc.
Row 15: Ch 1, turn, sc in each st across for cuff. (27 sc)
Rows 16 to 18: Ch 1, turn, sc in back loop only of each sc across.
Fasten off, leaving a long tail for seaming.
Assembly
- Lay back panel flat, RS facing up.
- Position front panels on each side, RS up, with granny squares at center front.
- Seam shoulders: Join 2 inches on each side, leaving 4-inch neck opening.
- Attach sleeves to armhole openings, matching center of sleeve to shoulder seam.
- Seam sleeve underarms and side seams in one continuous line.
Neckline Edging
Round 1: Join Color A at right front neck edge. Sc evenly around entire neckline, approximately 48 to 52 sc. Sl st to join.
Round 2: Ch 1, sc in back loop only of each sc around. Sl st to join. Fasten off.
Button Band (Left Front for Girls)
Row 1: Join Color A at bottom left front edge. Sc evenly up front edge, working approximately 32 sc. Turn.
Rows 2 to 3: Ch 1, sc in back loop only of each sc. Fasten off.
Buttonhole Band (Right Front)
Row 1: Join Color A at top right front edge. Sc evenly down front edge, 32 sc. Turn.
Row 2: Ch 1, sc in back loop of first 2 sc, ch 2, sk 2 sc, sc in back loop of next 4 sc, rep 4 more times, ending with sc in last 2 sc. Turn.
Row 3: Ch 1, sc in back loop of each sc and 2 sc in each ch-2 sp across. Fasten off.
Bottom Ribbing
Row 1: Join Color A at bottom right front corner. Sc evenly across entire bottom edge, including front bands. Turn.
Rows 2 to 4: Ch 1, sc in back loop only of each sc across. Fasten off.
Finishing Tips
- Block all pieces before assembly for easier seaming.
- Use mattress stitch for invisible side seams.
- Sew buttons opposite buttonholes using matching thread.
- Weave in all ends securely, especially on the granny squares where color changes occur.
Common Mistakes to Avoid
- Tight tension on granny squares: Keep your tension relaxed so squares lie flat.
- Misaligned squares: Pin squares together before seaming to ensure sunburst centers align horizontally.
- Buttonhole placement: Try the cardigan on baby (or measure against existing clothing) before sewing buttons permanently.
Customization Ideas
Swap the blue gradient for pinks, yellows, or rainbow colors. Use variegated yarn for the sunburst center for a different effect. Add an extra row to sleeves and body for 12 to 18 month sizing.
This cardigan makes a beautiful handmade gift and works up quickly once you have your squares finished. The combination of bold granny squares and delicate shell sleeves creates a piece any baby would look adorable wearing.
Related Articles
- Adorable Monster Hooded Baby Sweater Crochet Pattern Guide
- Adorable Crochet Lion Amigurumi Pattern for Beginners & Beyond
- Adorable Granny Square Tutu Dress: Free Crochet Pattern for Girls
- Adorable Crochet Bunny Amigurumi & Matching Baby Rattle Set
- DIY Crochet Jewelry Set: Matching Earrings, Necklace & Bracelet