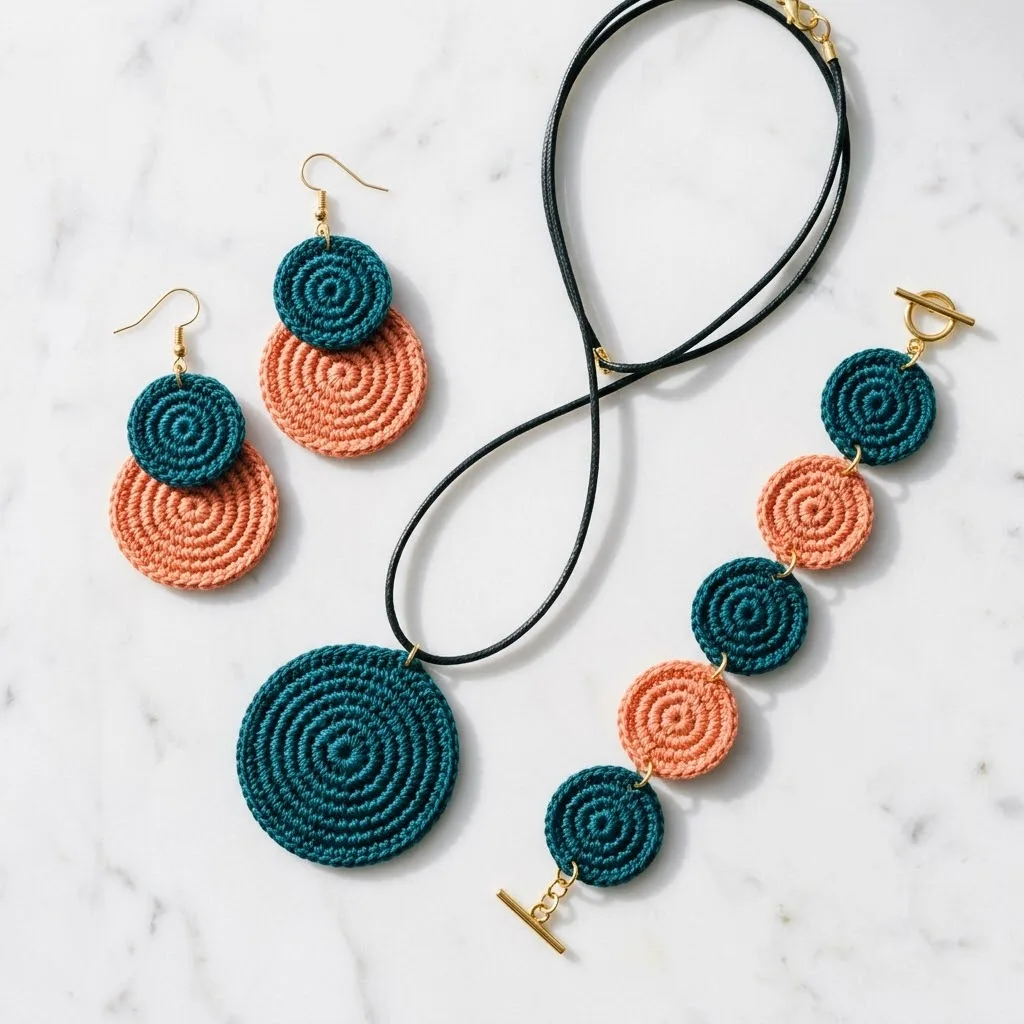
This matching crochet jewelry set features flat spiral discs in deep teal and warm coral, connected with gold findings and finished with a black leather cord. The tight single crochet spirals create a clean, modern aesthetic that looks polished enough for everyday wear. Here is the complete pattern to make all three pieces.
Materials
Yarn:
- Crochet thread size 10 in teal (approximately 50 yards)
- Crochet thread size 10 in coral (approximately 30 yards)
Hook:
- Steel crochet hook 1.5mm (US 7 steel)
Findings and Hardware:
- 2 gold fish hook earring wires
- 6 small gold jump rings (5mm)
- 1 gold toggle clasp
- 1 gold bail or large jump ring for pendant
- 18 inches black leather cord (2mm)
- 2 gold cord end caps with loops
Tools:
- Tapestry needle
- Jewelry pliers
- Fabric stiffener or clear nail polish
- Scissors
Finished Measurements
- Large disc (pendant): approximately 1.5 inches diameter
- Medium disc: approximately 1 inch diameter
- Small disc: approximately 0.5 inch diameter
Abbreviations
- ch: chain
- sc: single crochet
- sl st: slip stitch
- inc: increase (2 sc in same stitch)
Pattern Notes
All discs are worked in a continuous spiral without joining rounds. Use a stitch marker to track the beginning of each round. The spiral technique creates the visible coiled texture seen in the finished pieces. Pull your stitches tight for a firm, jewelry-quality fabric.
Small Disc Pattern (Make 4 in Teal)
Round 1: Magic ring, 6 sc in ring. (6 sts)
Round 2: Inc in each st around. (12 sts)
Round 3: Sc 1, inc repeat around. (18 sts)
Sl st to next st, fasten off. Weave in tail through back loops of final round to secure.
Medium Disc Pattern (Make 2 in Coral)
Round 1: Magic ring, 6 sc in ring. (6 sts)
Round 2: Inc in each st around. (12 sts)
Round 3: Sc 1, inc repeat around. (18 sts)
Round 4: Sc 2, inc repeat around. (24 sts)
Round 5: Sc 3, inc repeat around. (30 sts)
Sl st to next st, fasten off. Weave in end.
Large Disc Pattern (Make 1 in Teal)
Round 1: Magic ring, 6 sc in ring. (6 sts)
Round 2: Inc in each st around. (12 sts)
Round 3: Sc 1, inc repeat around. (18 sts)
Round 4: Sc 2, inc repeat around. (24 sts)
Round 5: Sc 3, inc repeat around. (30 sts)
Round 6: Sc 4, inc repeat around. (36 sts)
Round 7: Sc 5, inc repeat around. (42 sts)
Sl st to next st, fasten off. Weave in end securely.
Stiffening the Discs
Apply fabric stiffener to all discs and lay flat on wax paper to dry. For a quicker method, apply two coats of clear nail polish to each side, allowing full drying between coats. This step is essential for the discs to hold their shape as jewelry.
Assembling the Earrings
Each earring uses one small teal disc and one medium coral disc.
- Attach a jump ring through the edge of one small teal disc at the top center.
- Connect this jump ring to the loop on the earring wire.
- Attach a second jump ring through the bottom edge of the teal disc.
- Thread this same jump ring through the top edge of one medium coral disc.
- Close the jump ring securely with pliers.
- Repeat for the second earring.
The small teal disc should sit above the larger coral disc, creating the layered double-circle look shown in the image.
Assembling the Necklace
- Attach a bail or large jump ring through the top edge of the large teal disc.
- Attach cord end caps to each end of the leather cord using jewelry glue or by crimping.
- Thread the pendant onto the cord through the bail.
- The cord shown has a simple loop closure, but you can add a lobster clasp to the cord ends for easier wear.
Assembling the Bracelet
The bracelet alternates between small teal discs and medium coral discs in a linear pattern.
- Lay out the discs in order: small teal, medium coral, small teal, medium coral, small teal.
- Connect adjacent discs with jump rings through their edges, keeping all discs facing the same direction.
- Attach one half of the toggle clasp to the first small teal disc.
- Attach the toggle bar to the last small teal disc.
- Test the fit around your wrist and adjust disc arrangement if needed.
Tips for Best Results
Tension matters: Keep your stitches consistently tight throughout. Loose stitches will create a floppy disc that will not hold up as jewelry.
Magic ring technique: If your magic ring shows a hole in the center, pull the tail tighter before weaving in. The center should be completely closed.
Color variations: This design works beautifully in any two contrasting colors. Try navy and mustard, burgundy and blush, or black and white for different aesthetics.
Thread alternatives: Embroidery floss works if you do not have crochet thread. Use all six strands and the same hook size.
Preventing curl: If discs curl at edges, you are increasing too quickly or your tension is uneven. Block the discs while damp before stiffening.
Care Instructions
Store pieces flat to prevent bending. Avoid getting wet. Clean gently with a dry soft cloth. The stiffener will protect the thread, but these are best for occasional wear rather than daily use.
This three-piece set makes a thoughtful handmade gift or a stylish addition to your own accessories. The pattern works up quickly, and once you master the flat disc technique, you can easily scale up or down for different jewelry styles.
Related Articles
- DIY Crochet Hair Bow Pattern: Elegant Lacework Accessory Tutorial
- Adorable Crochet Bunny Lovey Pattern Using Plush Chenille Yarn
- Adorable Granny Square Tutu Dress: Free Crochet Pattern for Girls
- Adorable Crochet Bunny Amigurumi & Matching Baby Rattle Set
- Stunning Crochet Rose Bracelets: Free Pattern for Floral Jewelry