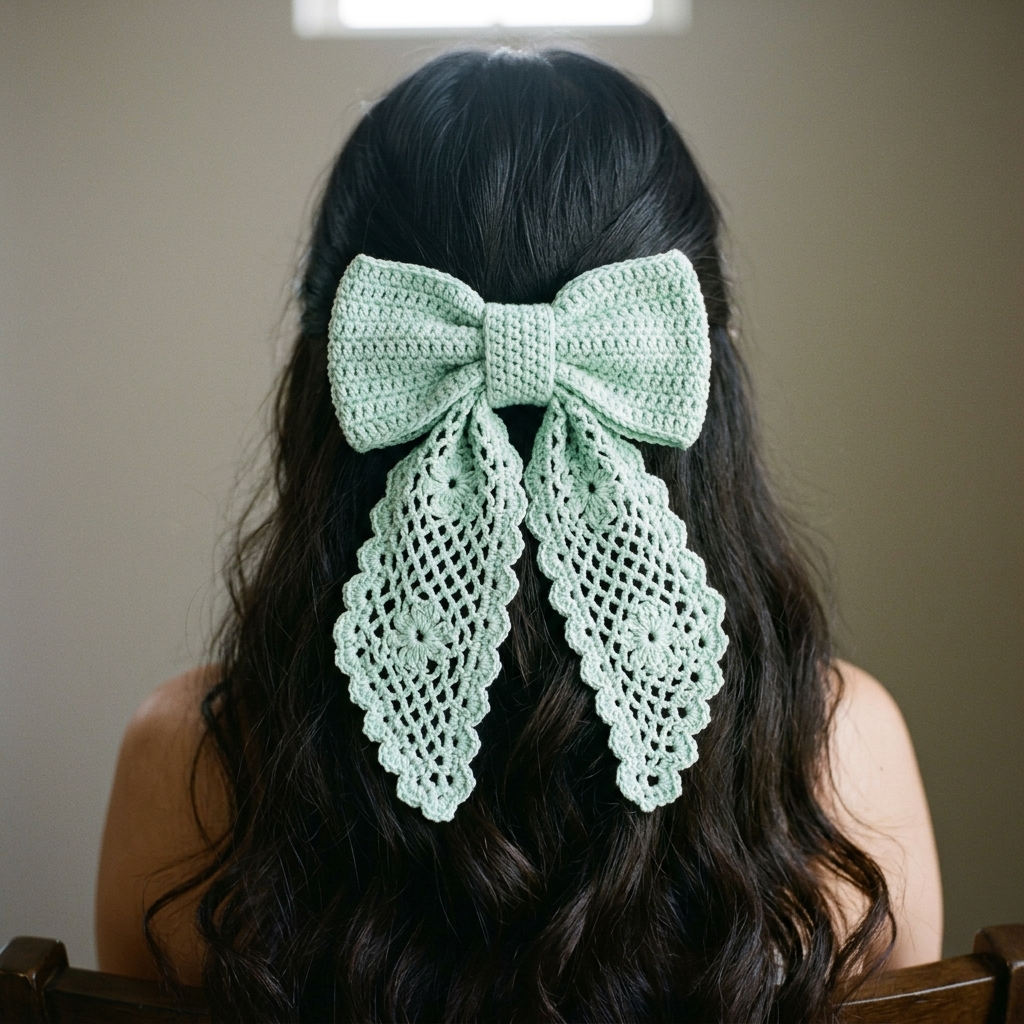
This elegant sage green crochet hair bow features a solid single crochet bow section with delicate lacy tails that drape beautifully against dark hair. The bow measures approximately 5 inches across with 7-inch trailing tails featuring an open mesh pattern with small flower motifs and scalloped edges. Here is the complete pattern to make your own.
Materials Needed
- 50g DK weight cotton yarn (shown in sage green)
- 3.5mm crochet hook
- Large hair clip or barrette base (3 to 4 inches)
- Yarn needle
- Scissors
- Hot glue gun (optional)
Abbreviations
- ch – chain
- sc – single crochet
- dc – double crochet
- sl st – slip stitch
- sk – skip
- sp – space
- rep – repeat
Gauge
20 sc x 22 rows = 4 inches in single crochet. Gauge is not critical but affects finished size.
Finished Measurements
- Bow loop: 5 inches wide x 3 inches tall
- Each tail: approximately 7 inches long x 2.5 inches wide
- Center wrap: 1.5 inches wide
Part 1: The Bow Loop
The bow section uses dense single crochet for structure.
Row 1: Ch 61, sc in 2nd ch from hook and each ch across. (60 sc)
Rows 2 to 16: Ch 1, turn, sc in each sc across. (60 sc)
Fasten off, leaving a 12-inch tail. Fold the rectangle in half lengthwise so short ends meet. Whip stitch the short ends together to form a loop.
Pinch the center of the loop to create the bow shape. Use a length of yarn to wrap tightly around the pinched center 3 to 4 times. Secure with a knot but do not cut. Set aside.
Part 2: Lacework Tails (Make 2)
Each tail combines an open mesh pattern with small flower clusters and scalloped edges.
Starting Chain and Foundation
Row 1: Ch 16, dc in 4th ch from hook, dc in next 2 ch, ch 2, sk 2, dc in next 3 ch, ch 2, sk 2, dc in last 4 ch. (11 dc, 2 ch-2 spaces)
Row 2: Ch 3 (counts as dc), turn, dc in next 3 dc, ch 2, dc in ch-2 sp, ch 2, dc in next 3 dc, ch 2, dc in ch-2 sp, ch 2, dc in last 4 dc.
Row 3: Ch 3, turn, dc in next 3 dc, ch 2, sk ch-2 sp, work flower cluster in next dc (see below), ch 2, dc in next 3 dc, ch 2, work flower cluster, ch 2, dc in last 4 dc.
Flower Cluster Instructions
In designated stitch: (dc, ch 1) 4 times, dc in same st. This creates a small 5-petal flower motif.
Row 4: Ch 3, turn, dc in next 3 dc, ch 2, sc in center of flower cluster, ch 2, dc in next 3 dc, ch 2, sc in center of flower cluster, ch 2, dc in last 4 dc.
Rows 5 to 8: Rep Rows 1 to 4 pattern.
Rows 9 to 16: Continue mesh and flower pattern, gradually decreasing width.
Decreasing for Tail Shape
Row 17: Ch 3, turn, dc2tog, dc in next dc, continue pattern to last 4 sts, dc in next dc, dc2tog, dc in last st.
Rows 18 to 24: Continue decreasing 1 st each side every other row while maintaining mesh pattern until 6 sts remain.
Row 25: Ch 3, turn, dc2tog twice, dc in last st. (4 sts)
Row 26: Ch 3, turn, dc3tog. Fasten off.
Scalloped Edge Border
Join yarn at top corner of tail. Work around entire outer edge as follows:
Round 1: Sc evenly around, working 3 sc in each corner and approximately 2 sc per row along sides.
Round 2: Sk 1 sc, 5 dc in next sc, sk 1 sc, sl st in next sc rep around entire edge. This creates the scalloped border visible in the finished piece.
Fasten off and weave in ends. Block tail pieces if desired for crispness.
Part 3: Center Wrap
Row 1: Ch 9, sc in 2nd ch from hook and each ch across. (8 sc)
Rows 2 to 10: Ch 1, turn, sc in each sc across.
Fasten off, leaving a long tail for assembly.
Assembly
Step 1: Attach Tails to Bow
Position both lacy tails behind the pinched center of the bow loop. The wider ends should be at the top, hidden behind the bow. The tapered ends with scalloped edges should hang down freely.
Use yarn needle to securely stitch the tail tops to the back of the bow center.
Step 2: Wrap the Center
Take the center wrap piece and place it over the front of the pinched bow center. Wrap it around to the back, covering the attachment point of the tails. Stitch securely in place with yarn needle.
Step 3: Attach Hair Clip
Position the barrette or hair clip on the back of the bow, centered behind the wrap. Either stitch the clip bar to the crocheted fabric or use hot glue for a secure hold. If stitching, work small stitches through the clip holes and into the center wrap backing.
Tips for Best Results
- Yarn choice matters. Cotton yarn holds the lacework structure better than acrylic. It also provides weight for the tails to drape properly.
- Block your pieces. Pin the lacy tails flat and lightly steam or wet block them before assembly. This opens up the mesh pattern and makes the flower clusters more defined.
- Adjust tail length. For shorter hair, work fewer rows in the tail section. For longer hair or more drama, add extra pattern repeats.
- Color variations. This pattern works beautifully in white for weddings, black for evening wear, or pastels for spring. Consider using variegated yarn for the tails only while keeping the bow solid.
- Reinforce the clip. The bow has some weight due to the tails. Use a sturdy metal clip rather than a lightweight plastic one.
Common Mistakes to Avoid
Do not skip blocking. Unblocked lacework looks crumpled and the flower motifs will not show properly.
Do not attach the clip too high. Center it behind the wrap so the bow sits flat against the head.
Do not pull the center wrap too tight. It should gather the bow attractively without crushing the fabric.
This elegant lacework bow makes a beautiful handmade accessory for special occasions or everyday wear. The combination of solid crochet and delicate openwork creates visual interest while the trailing tails add movement. Make one in every color to match your wardrobe.