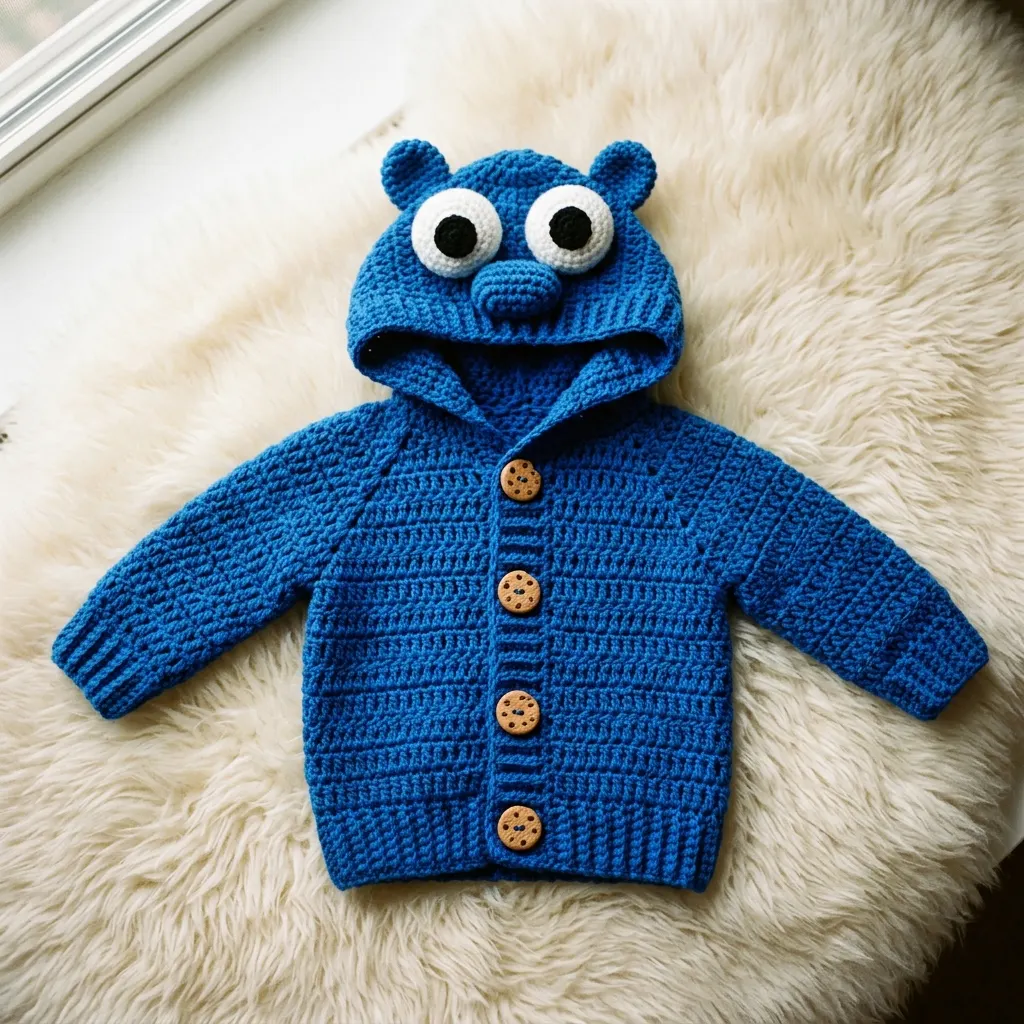
This bright blue monster hooded baby cardigan features adorable googly eyes, small ears, and cookie-shaped buttons that make it an instant favorite for little ones. The sweater uses basic half double crochet stitches throughout the body with ribbed cuffs and hem for a polished finish. Here is the complete pattern to make your own.
Materials Needed
- Worsted weight yarn (4) in blue, approximately 350 yards
- Small amounts of white and black yarn for eyes
- 5.0mm (H/8) crochet hook
- 4.0mm (G/6) hook for ribbing
- Four 20mm novelty cookie buttons
- Yarn needle
- Stitch markers
Gauge and Sizing
Gauge: 14 hdc and 10 rows = 4 inches with 5.0mm hook
Finished measurements (12 to 18 months):
- Chest: 22 inches
- Length: 12 inches
- Sleeve length: 9 inches
Abbreviations
- ch: chain
- hdc: half double crochet
- sc: single crochet
- sl st: slip stitch
- st(s): stitch(es)
- sk: skip
- inc: increase
- dec: decrease
- BLO: back loop only
Back Panel
With 5.0mm hook and blue yarn, ch 40.
Row 1: Hdc in 3rd ch from hook and each ch across. (38 sts)
Rows 2 to 30: Ch 2, turn, hdc in each st across. (38 sts)
Fasten off and weave in ends.
Left Front Panel
Ch 22.
Row 1: Hdc in 3rd ch from hook and each ch across. (20 sts)
Rows 2 to 24: Ch 2, turn, hdc in each st across. (20 sts)
Neck Shaping Row 25: Ch 2, turn, hdc in next 14 sts, leave remaining 6 sts unworked. (14 sts)
Row 26: Ch 2, turn, sk first st, hdc in remaining sts. (13 sts)
Rows 27 to 30: Ch 2, turn, hdc in each st across. (13 sts)
Fasten off.
Right Front Panel
Work same as left front through Row 24.
Neck Shaping Row 25: Ch 2, turn, sk first 6 sts, hdc in remaining 14 sts. (14 sts)
Row 26: Ch 2, turn, hdc to last 2 sts, hdc2tog. (13 sts)
Rows 27 to 30: Ch 2, turn, hdc in each st across. (13 sts)
Fasten off.
Sleeves (Make 2)
Ch 26.
Row 1: Hdc in 3rd ch from hook and each ch across. (24 sts)
Rows 2 to 4: Ch 2, turn, hdc in each st across. (24 sts)
Row 5: Ch 2, turn, 2 hdc in first st, hdc to last st, 2 hdc in last st. (26 sts)
Rows 6 to 8: Ch 2, turn, hdc in each st across. (26 sts)
Row 9: Repeat Row 5. (28 sts)
Rows 10 to 20: Ch 2, turn, hdc in each st across. (28 sts)
Fasten off.
Hood
Ch 62.
Row 1: Hdc in 3rd ch from hook and each ch across. (60 sts)
Rows 2 to 22: Ch 2, turn, hdc in each st across. (60 sts)
Fasten off. Fold hood in half and seam the back closed.
Ribbed Cuffs (Make 2)
With 4.0mm hook, ch 7.
Row 1: Sc in 2nd ch from hook and each ch across. (6 sts)
Rows 2 to 24: Ch 1, turn, sc in BLO across. (6 sts)
Fasten off, leaving a long tail for seaming.
Ribbed Hem Band
With 4.0mm hook, ch 9.
Row 1: Sc in 2nd ch from hook and each ch across. (8 sts)
Rows 2 to 76: Ch 1, turn, sc in BLO across. (8 sts)
Fasten off.
Eyes (Make 2)
White outer circle: With white yarn and 4.0mm hook, make magic ring. Round 1: Ch 1, 8 sc in ring, sl st to join. (8 sts) Round 2: Ch 1, 2 sc in each st around, sl st to join. (16 sts) Round 3: Ch 1, sc in next st, 2 sc in next st repeat around, sl st to join. (24 sts) Fasten off.
Black pupil: With black yarn, make magic ring. Round 1: Ch 1, 6 sc in ring, sl st to join. (6 sts) Round 2: Ch 1, 2 sc in each st around, sl st to join. (12 sts) Fasten off. Sew black pupil to center of white circle.
Ears (Make 2)
With blue yarn and 5.0mm hook, make magic ring.
Round 1: Ch 1, 6 sc in ring, sl st to join. (6 sts)
Round 2: Ch 1, 2 sc in each st around, sl st to join. (12 sts)
Round 3: Ch 1, sc in next st, 2 sc in next st repeat around, sl st to join. (18 sts)
Rounds 4 to 5: Ch 1, sc in each st around, sl st to join. (18 sts)
Fasten off, leaving a long tail.
Assembly
- Seam shoulder seams, matching 13 stitches on each side.
- Center sleeves at shoulder seams and sew in place.
- Sew side seams from hem to underarm.
- Sew sleeve seams from cuff to underarm.
- Attach ribbed cuffs to sleeve openings, stretching slightly to fit.
- Sew ribbed hem band along bottom edge of sweater.
- Pin hood to neckline, starting and ending at front edges. Seam in place.
- Sew eyes to hood front, spacing approximately 2 inches apart.
- Pinch ears at base and sew to top of hood, positioned above eyes.
- Mark button placement evenly along left front band.
- Sew cookie buttons to right front, creating buttonholes on left front by skipping stitches during a final edging row if needed.
Tips for Success
- Block all pieces before assembly for easier seaming.
- Use mattress stitch for invisible seams on the body.
- Secure eyes firmly with multiple passes of yarn for safety.
- Consider adding a button band for cleaner buttonholes.
- Adjust hood size by adding or removing rows if needed for fit.
This monster sweater works up quickly and makes a memorable baby gift. The cookie buttons add a playful touch that parents and babies both love. Try it in purple or green for a different monster personality.
Related Articles
- DIY Crochet Jewelry Set: Matching Earrings, Necklace & Bracelet
- Adorable Hugging Duck Amigurumi Pattern for Beginners
- Adorable Rainbow Amigurumi Bunny Pattern for Beginners
- DIY Crochet Hair Bow Pattern: Elegant Lacework Accessory Tutorial
- How to Crochet Stunning Floral Statement Earrings Step by Step