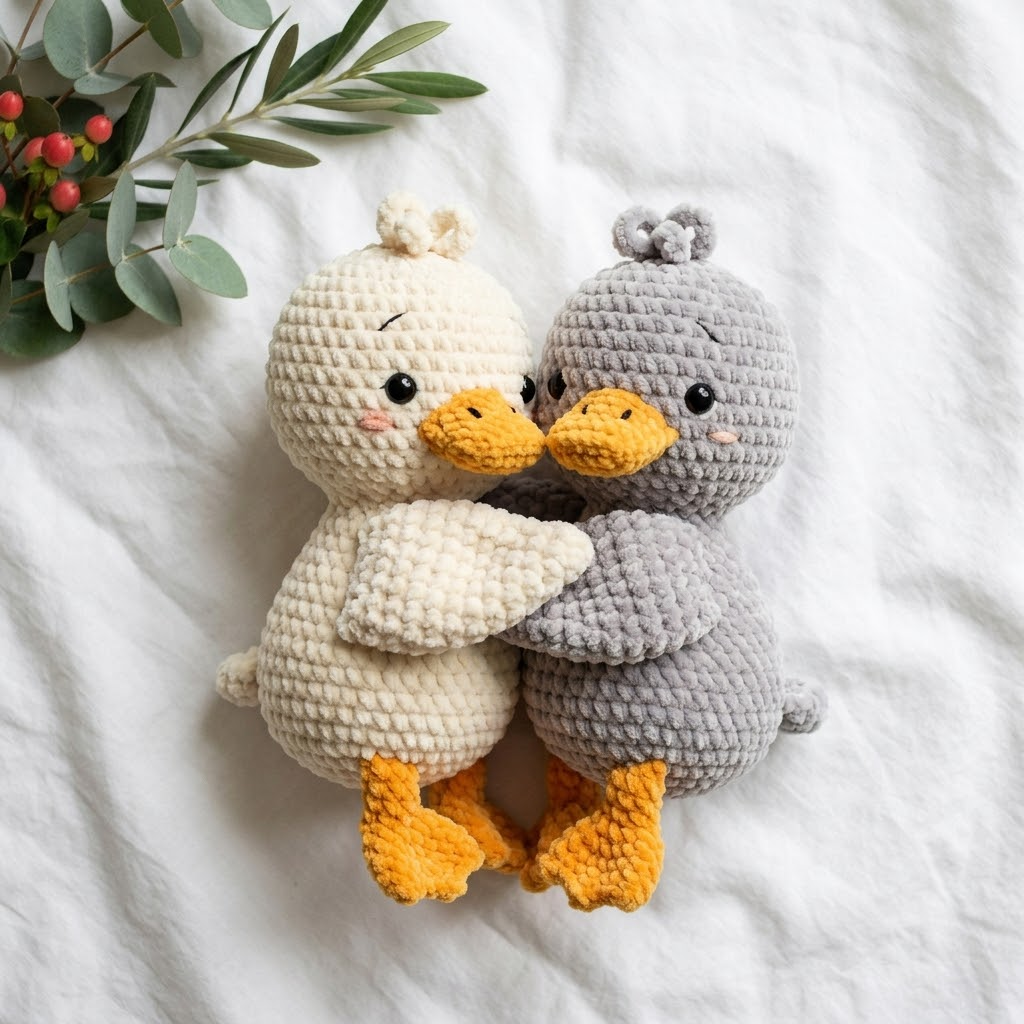
These plush hugging ducks made from chenille yarn are the perfect beginner amigurumi project. Standing approximately 8 inches tall, this cuddly pair features simple single crochet construction, adorable orange beaks and feet, and wings positioned for an eternal embrace. Let’s make them.
Materials Needed
- Chenille/velvet yarn (worsted weight equivalent): cream or gray for body, orange for beak and feet
- 5.0mm crochet hook
- 12mm safety eyes (2 per duck)
- Polyester fiberfill stuffing
- Yarn needle
- Stitch marker
- Pink embroidery floss for cheeks (optional)
- Black embroidery floss for eyebrows
Abbreviations
- MR: Magic ring
- sc: Single crochet
- inc: Increase (2 sc in same stitch)
- dec: Invisible decrease
- st(s): Stitch(es)
- rnd: Round
Gauge and Finished Size
Gauge is not critical for amigurumi. Use a hook size that creates tight stitches so stuffing does not show through. Finished duck measures approximately 8 inches tall.
Pattern Instructions
Head
Rnd 1: 6 sc in MR (6)
Rnd 2: inc in each st (12)
Rnd 3: (sc, inc) x 6 (18)
Rnd 4: (2 sc, inc) x 6 (24)
Rnd 5: (3 sc, inc) x 6 (30)
Rnd 6: (4 sc, inc) x 6 (36)
Rnds 7 to 12: sc in each st (36)
Rnd 13: (4 sc, dec) x 6 (30)
Rnd 14: (3 sc, dec) x 6 (24)
Insert safety eyes between rounds 9 and 10, approximately 8 stitches apart. Embroider small curved eyebrows above eyes using black floss.
Rnd 15: (2 sc, dec) x 6 (18)
Rnd 16: (sc, dec) x 6 (12)
Stuff head firmly.
Rnd 17: dec x 6 (6)
Fasten off and close hole.
Body
Rnd 1: 6 sc in MR (6)
Rnd 2: inc in each st (12)
Rnd 3: (sc, inc) x 6 (18)
Rnd 4: (2 sc, inc) x 6 (24)
Rnd 5: (3 sc, inc) x 6 (30)
Rnd 6: (4 sc, inc) x 6 (36)
Rnd 7: (5 sc, inc) x 6 (42)
Rnds 8 to 16: sc in each st (42)
Rnd 17: (5 sc, dec) x 6 (36)
Rnd 18: sc in each st (36)
Rnd 19: (4 sc, dec) x 6 (30)
Rnd 20: sc in each st (30)
Rnd 21: (3 sc, dec) x 6 (24)
Rnds 22 to 23: sc in each st (24)
Stuff body firmly.
Rnd 24: (2 sc, dec) x 6 (18)
Rnd 25: (sc, dec) x 6 (12)
Add more stuffing to neck area.
Fasten off, leaving a long tail for sewing to head.
Wings (Make 2)
Rnd 1: 6 sc in MR (6)
Rnd 2: inc in each st (12)
Rnd 3: (sc, inc) x 6 (18)
Rnds 4 to 8: sc in each st (18)
Rnd 9: (sc, dec) x 6 (12)
Rnds 10 to 11: sc in each st (12)
Stuff lightly. Flatten opening and sc edges together.
Fasten off, leaving tail for sewing.
Beak (Orange Yarn)
Rnd 1: 6 sc in MR (6)
Rnd 2: (sc, inc) x 3 (9)
Rnd 3: (2 sc, inc) x 3 (12)
Rnds 4 to 5: sc in each st (12)
Flatten and fold piece in half horizontally to create duck bill shape. Do not stuff.
Fasten off, leaving tail for sewing.
Feet (Make 2, Orange Yarn)
Rnd 1: 6 sc in MR (6)
Rnd 2: inc in each st (12)
Rnd 3: (sc, inc) x 6 (18)
Rnds 4 to 5: sc in each st (18)
Rnd 6: (sc, dec) x 6 (12)
Stuff lightly. Flatten opening.
Fasten off, leaving tail for sewing.
Tail
Rnd 1: 5 sc in MR (5)
Rnd 2: inc in each st (10)
Rnds 3 to 4: sc in each st (10)
Rnd 5: dec x 5 (5)
Do not stuff. Fasten off, leaving tail for sewing.
Top Knot (Head Tuft)
Rnd 1: 6 sc in MR (6)
Rnd 2: inc in each st (12)
Rnd 3: sc in each st (12)
Rnd 4: dec x 6 (6)
Fasten off, leaving tail for sewing. This creates the cute curly tuft visible on top of each duck’s head.
Assembly
- Attach head to body: Position head on neck opening. Use whip stitch to sew securely all around.
- Position beak: Sew flattened beak below eyes, centered on face. The fold creates the characteristic duck bill shape.
- Add wings: Attach wings to sides of body at a slight forward angle. For hugging ducks, position wings so they extend toward the front of the body.
- Sew feet: Attach feet to bottom front of body. Angle them slightly outward.
- Attach tail: Sew small tail piece to back bottom of body.
- Add top knot: Sew tuft to center top of head.
- Embroider cheeks: Using pink floss, make small satin stitch circles below and slightly outside each eye.
Tips for Chenille Yarn Success
Chenille yarn creates that soft, plush texture visible in these ducks but requires some adjustments.
Use a larger hook: Go up 0.5 to 1mm from what you would normally use. This prevents splitting the yarn.
Work slowly: Chenille tends to split. Insert your hook deliberately into each stitch.
Mark your rounds: The fuzzy texture makes it hard to see stitches. Always use a stitch marker.
Stuff as you go: Add fiberfill before openings get too small. Chenille pieces are harder to manipulate once complete.
Count frequently: Lost stitches hide easily in this yarn.
Making the Hugging Pair
To create ducks that hug like the pair shown, make one in cream and one in gray. When assembling, position the wings so they wrap around and meet when the ducks are placed side by side. You can tack the wing tips together with a few hidden stitches if you want them permanently connected.
This project works wonderfully as a baby gift, wedding present, or anniversary keepsake. The simple single crochet construction makes it ideal for beginners, while the chenille yarn elevates the finished look to something truly special.
Grab your hook and start your hugging duck pair today.
Related Articles
- Adorable Granny Square Crochet Toddler Summer Set Pattern Guide
- DIY Crochet Hair Bow Pattern: Elegant Lacework Accessory Tutorial
- Adorable Monster Hooded Baby Sweater Crochet Pattern Guide
- Adorable Crochet Bunny Lovey Pattern Using Plush Chenille Yarn
- Adorable Crochet Flower Keychains: 4 Easy Spring Patterns to Make